为什么需要使IT工作可视化并控制半成品
摘自《凤凰项目》
本书中我最喜欢的(也是唯一的)一张图表显示,等待时间是工作中心中某个资源忙碌程度的函数。埃瑞克用这张图表来说明为什么布伦特的30分钟的简单变更要耗费几个星期才能完成。原因显然是,作为所有工作的瓶颈,布伦特的使用率一直是100%甚至超过100%,因此,我们每次交给他的工作都只能在队列里枯等,如果不进行加速或升级处置,就永远不会完成。
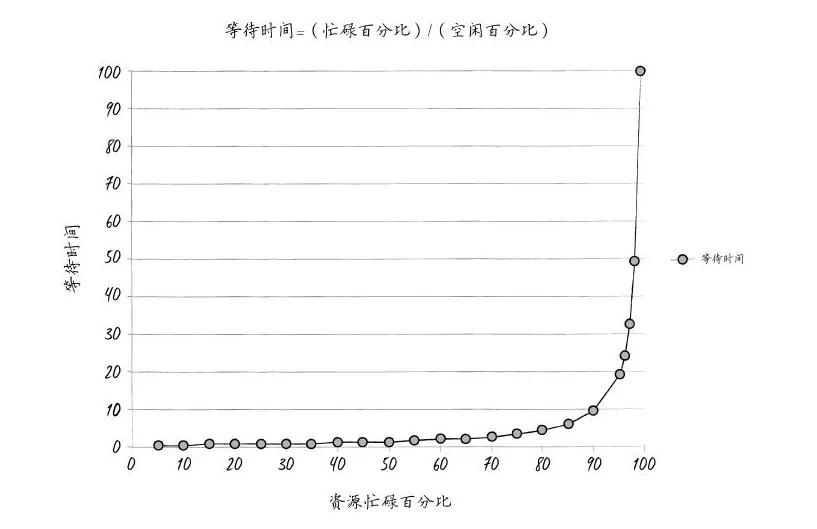
图表显示:横坐标轴上是工作中心中给定资源的忙碌百分比,纵坐标轴上是大致的等待时间(更确切地说是队列长度)。曲线的形状表明,当资源使用率超过80%时,等待时间就会直线上升。
本书中,比尔及其团队意识到,他们对项目管理办公室承诺的交付期会带来怎样的灾难性后果。
我告诉他们,埃瑞克在MRP-8对我说过,等待时间取决于资源使用率。“等待时间是‘忙碌时间百分比’除以‘空闲时间百分比’。也就是说,如果一个资源的忙碌时间是50%,那么它的空闲时间也是50%。等待时间就是50%除以50%,也就是一个时间单位。就说是一个小时吧。所以平均来说,一个任务在处理前的排队等待时间为一个小时。”
“另一方面,如果一个资源90%的时间是忙碌的,等待时间就是‘90%除以10%’,也就是9个小时。换言之,我们的任务排队等待的时间,将是资源有50%空闲时的9倍。”
我得出结论:“因此,对这个凤凰任务来说,假设我们有7个交接步骤,而且每一个资源都有90%的时间是忙碌的,那么任务排队等待的总时间就是9小时乘以7个步骤……”
“什么?只是排队等待的时间就要63个小时?”韦斯充满疑惑地说,“这不可能!”
帕蒂似笑非笑地说:“哦,当然了。因为输入字符只需要30秒,对不对?”
比尔及其团队意识到,他们那个30分钟的简单任务实际上需要7个交接步骤(也就是服务器团队、网络维护团队、数据库团队、虚拟化团队,当然还有布伦特、布伦特、布伦特)。假设所有工作中心都有90%的时间是忙碌的,那么这张图表告诉我们,在每一个工作中心的平均等待时间是9个小时。由于工作必须经过7个工作中心,总共等待时间就是7倍:63个小时。
也就是说,总的“有效时间”(有时候也称为“加工时间”)只有总交付周期的0.16%(30分钟除以63小时)。那就意味着,在总交付周期99.8%的时间里,工作只不过在排着队等待被执行(例如,在报修系统里等和在电子邮件里等)。
我的合著者乔治·斯帕福德和我同在华盛顿州立大学参加詹姆斯·霍尔特博士(在延伸阅读部分有更详细的介绍)的EM526约束管理课程时,我们首次见到了这张图,它如此出色地显示出,高资源使用率所导致的长时间排队的破坏性本质。
遗憾的是,我不知道这幅图的确切来历。有人和我一样相信,这幅图是立特尔法则的简化版本。根据这个法则,我们假定的是只有一个工作中心、均匀的工作队列(例如,所有任务需要的完成时间都相同)、工作之间没有延迟等。
在这幅图中,我相信“等待时间”其实代表着“队列长度”。也就是说,由于它不是所用时间,因此没有时间单位(也就是说,既不是分钟,也不是小时、天)。关于此书派生出来的最棒的讨论(及其合理性/不合理性)都可以在Linkedin网站上本书的页面看到。这些讨论尽管有时略显尖刻,但确实充满智慧。
我的看法是,科学的目标是用最少的原理来解释最多的现象,并揭示惊人的内涵。我认为这张图很能说明问题。它有效阐释了过度压榨IT工作者的灾难性后果,以及在IT运维部门使用传统项目管理方式的错误。