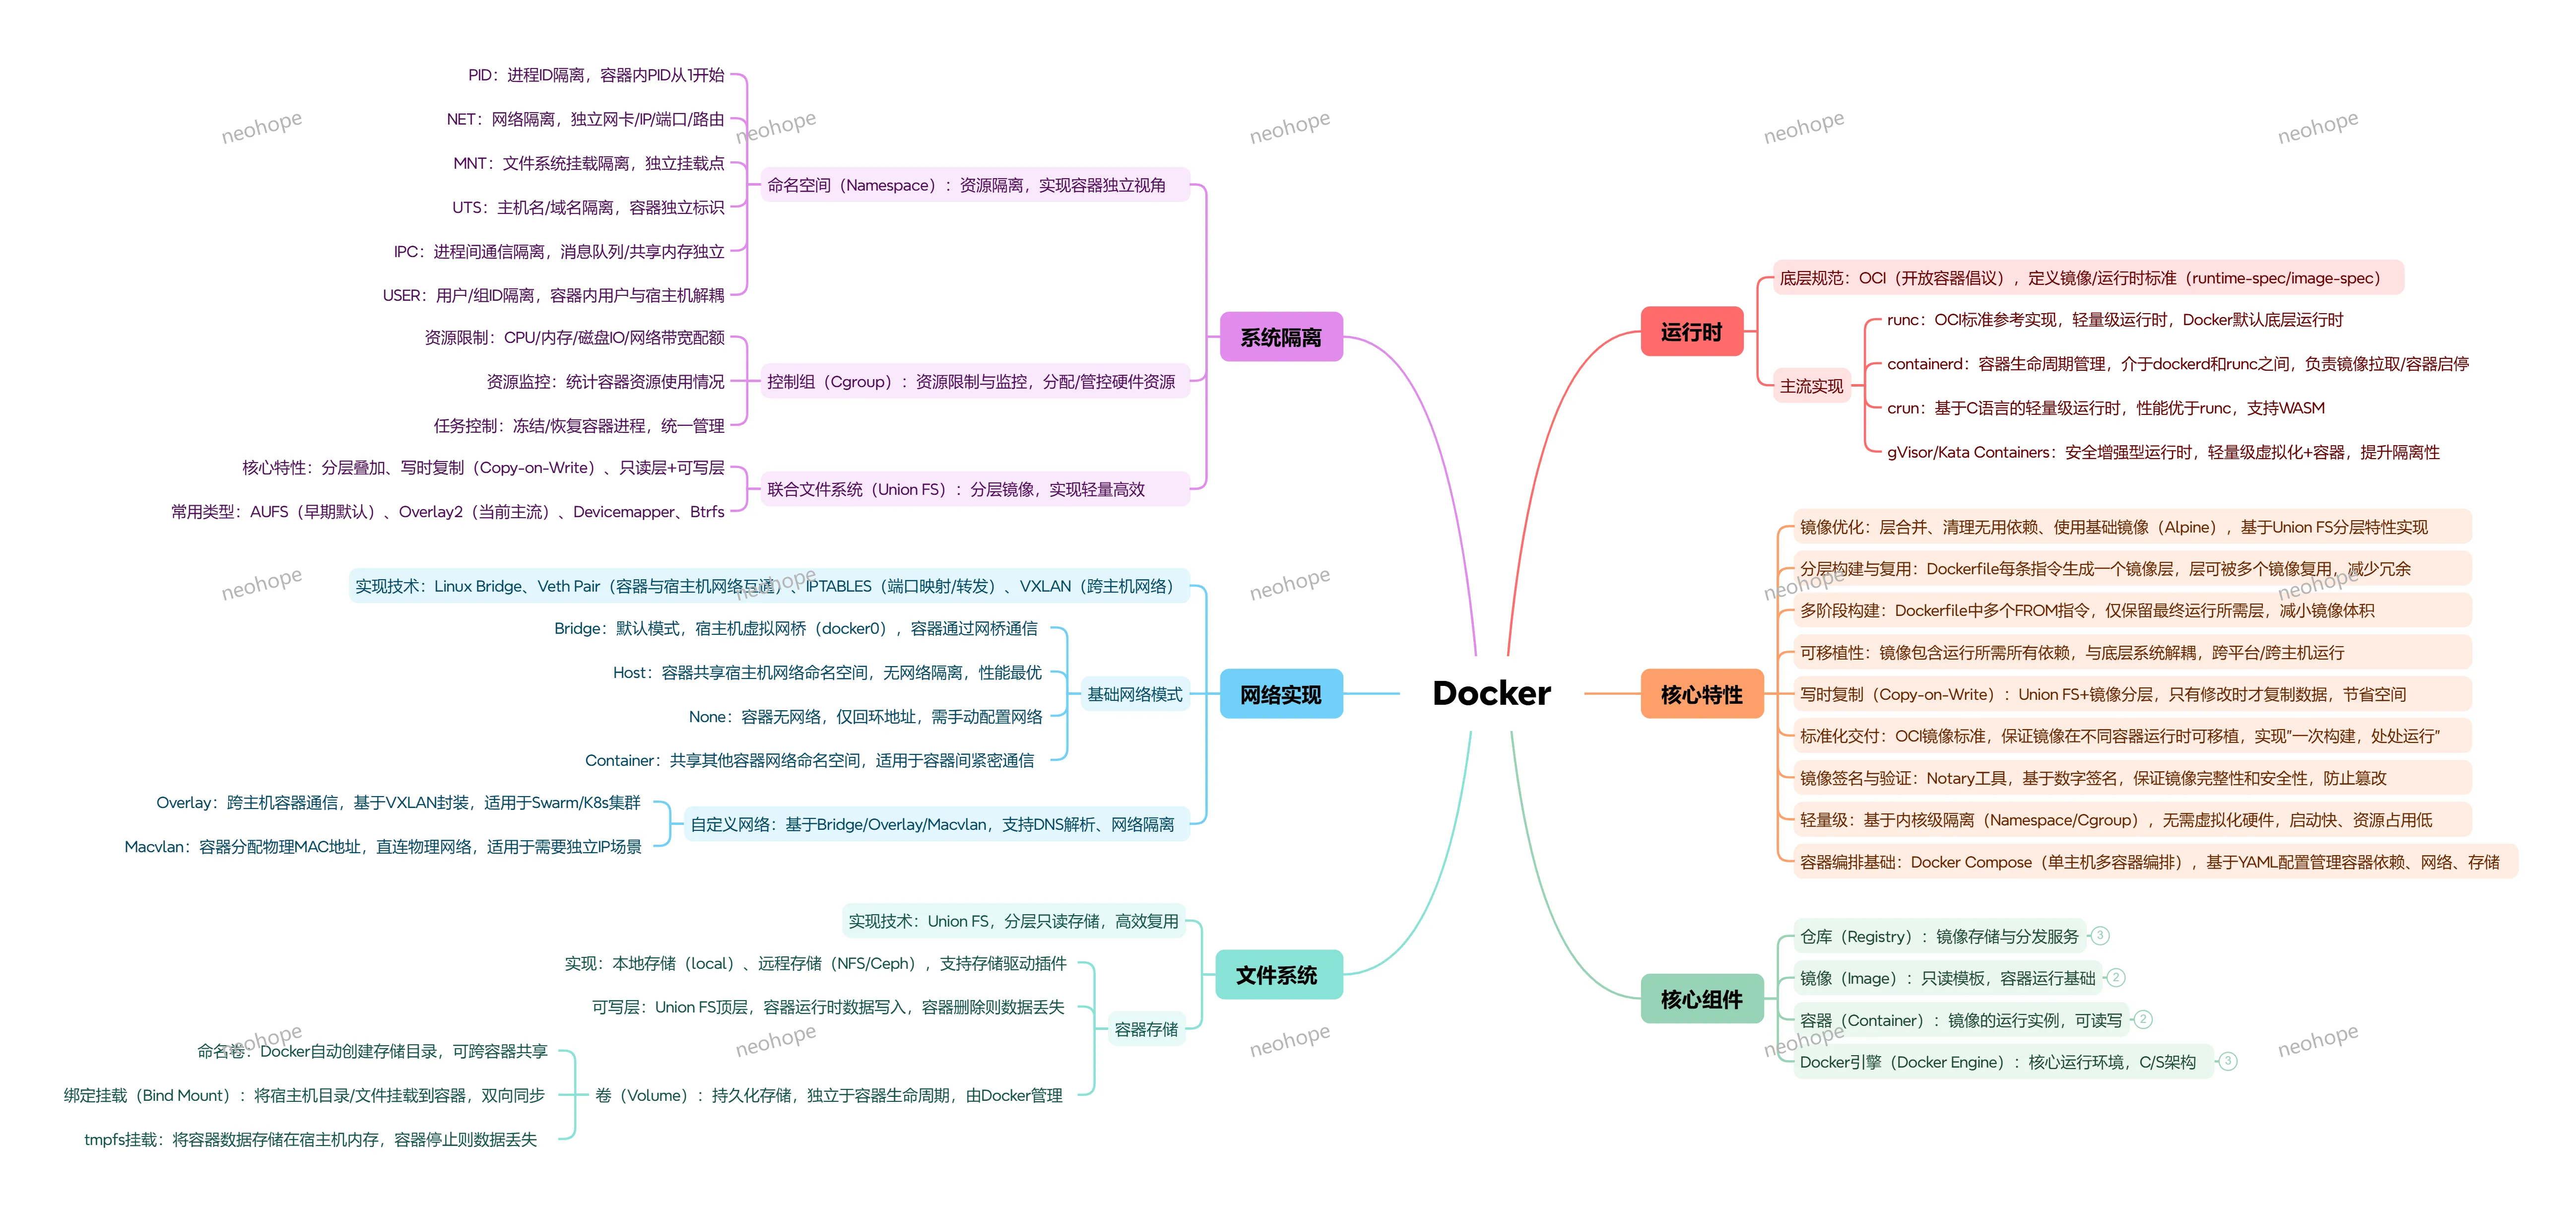
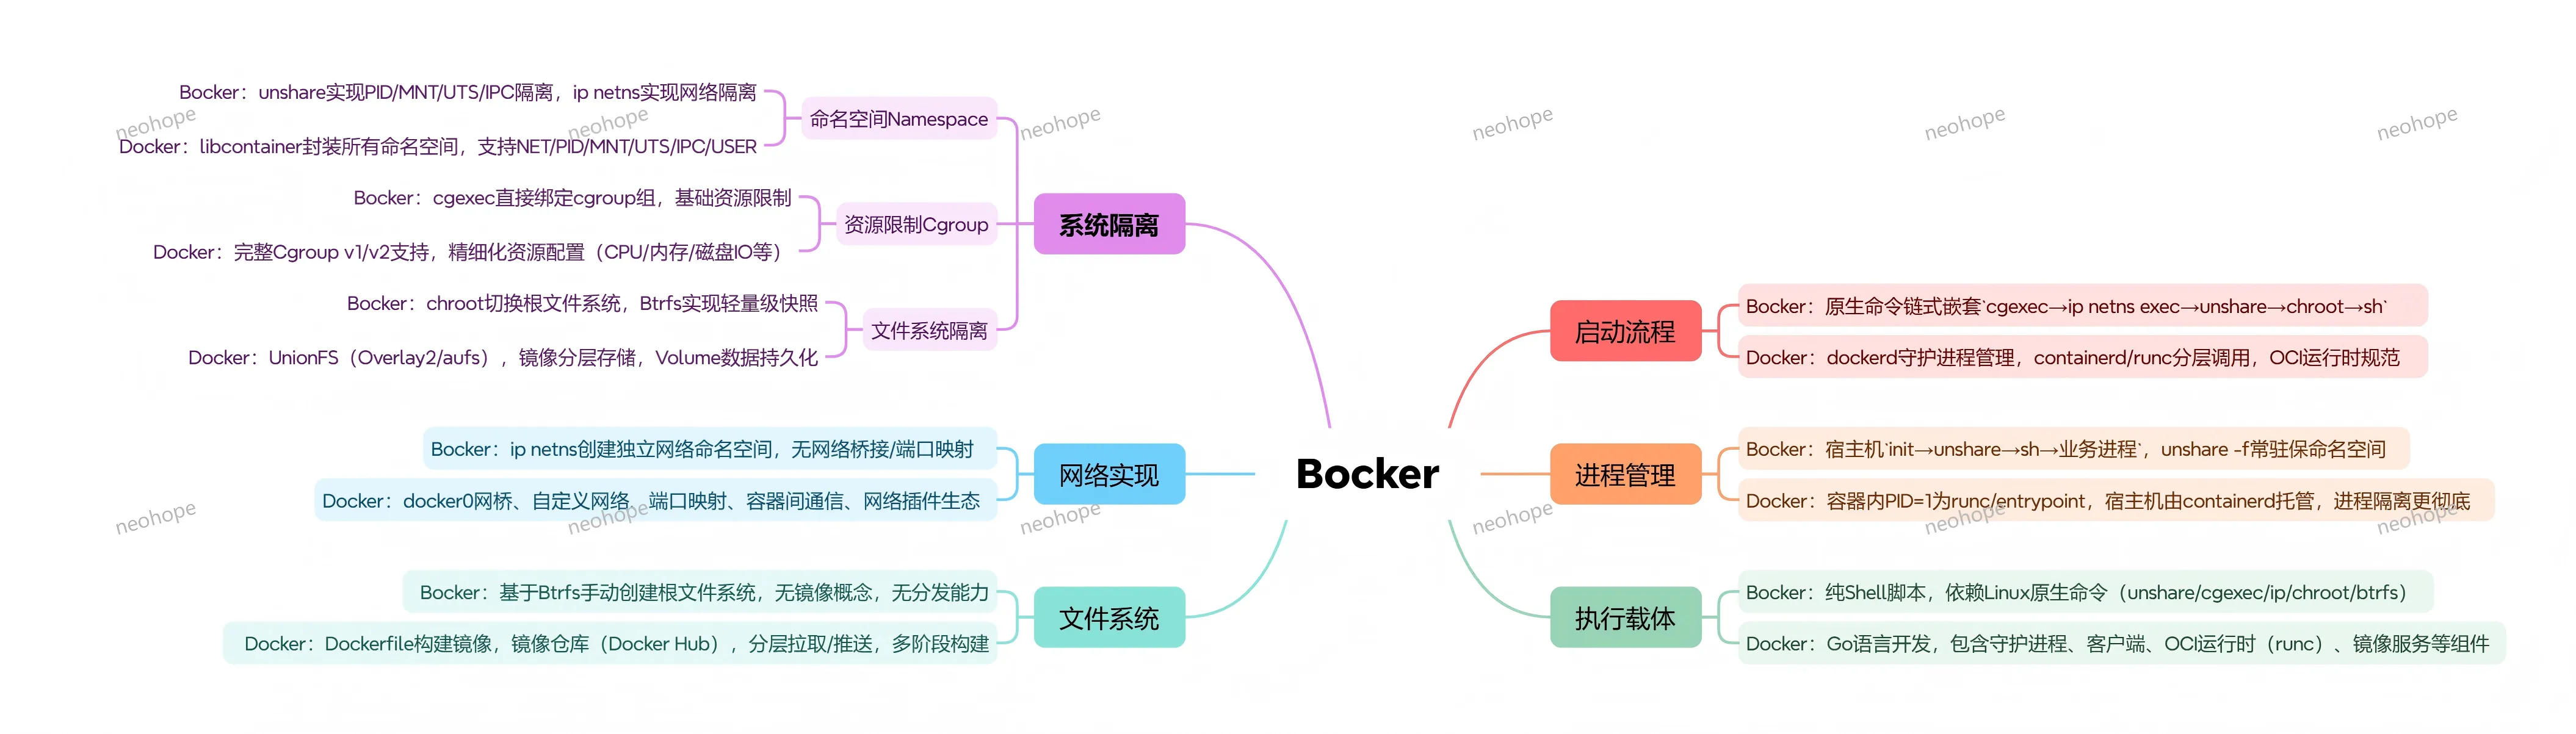
如果你对docker的实现原理比较感兴趣,建议读一下bocker的代码。
bocker用shell实现了docker的核心功能,代码就100来行,十分精炼。
我已经帮大家做好代码注释了,感兴趣可以读一下这个文件:
bocker.sh
PS:这是十年前的注释了,如果有错误或遗漏,欢迎指出。
Learn and share.
如果你对docker的实现原理比较感兴趣,建议读一下bocker的代码。
bocker用shell实现了docker的核心功能,代码就100来行,十分精炼。
我已经帮大家做好代码注释了,感兴趣可以读一下这个文件:
bocker.sh
PS:这是十年前的注释了,如果有错误或遗漏,欢迎指出。

本节介绍如何编译ceph和nfs-ganesha源码:
1、ceph编译
git clone git://github.com/ceph/ceph
cd ceph
git checkout v15.2.3
git submodule update --init --recursive
./install-deps.sh
ARGS="-DCMAKE_BUILD_TYPE=RelWithDebInfo" ./do_cmake.sh
cd build
make -j4
make install
2、nfs-ganesha编译
#这一段移动到“CEPH环境搭建06”去了
#只需要将版本从V3.2换成V3.3即可
3、这两个编译后,需要手工安装FSAL库
cp nfs-ganesha/build/FSAL/FSAL_CEPH/libfsalceph.so /usr/lib/x86_64-linux-gnu/ganesha/
cp nfs-ganesha/build/FSAL/FSAL_RGW/libfsalrgw.so /usr/lib/x86_64-linux-gnu/ganesha/
完全从源码编译后,用GANESHA确实可以成功挂载RGW,但是空的,而且是只读。
本节主要是将rbd(也就是块存储),通过LIO映射为iscsi(也就是ip san),从而提供给其他系统使用。这种方式比fuse后再映射出来性能要好,因为fuse是要经过内核的,要做切换。
0、原本计划使用容器继续处理,但没能成功,如果你成功了麻烦告诉我一下如何做的。
#这条路没测试成功,原理上应该是一样的
ceph orch daemon add iscsi rbd --placement="1 ceph-0002"
后面是通过编译源码的方式来完成的。
1、我们在“CEPH环境搭建03”中已经建立了rbd pool,而且建立了r1,r2,r3三个存储设备
rbd ls
r1
r2
r4
2、升级linux内核
#ceph-0002
#当前内核版本比较低,会导致LIO操作失败,表现为在所以必须升级
#在gwcli做attach或create硬盘时,会报错
#Issuing disk create/update request Failed : disk create/update failed on xxx. LUN allocation failure...
#去看rbd-target-api的日志,会发现:
#Could not set LIO device attribute cmd_time_out/qfull_time_out for device: rbd/r2. Kernel not supported. - error(Cannot find attribute: qfull_time_out)
uname -a
4.15.0-91-generic x86_64 GNU/Linux

# 查看可以使用的内核版本
apt list | grep linux-generic
linux-generic/bionic-updates,bionic-security 4.15.0.101.91 amd64 [upgradable from: 4.15.0.91.83]
linux-generic-hwe-16.04/bionic-updates,bionic-security 4.15.0.101.91 amd64
linux-generic-hwe-16.04-edge/bionic-updates,bionic-security 4.15.0.101.91 amd64
linux-generic-hwe-18.04/bionic-updates,bionic-security 5.3.0.53.110 amd64
linux-generic-hwe-18.04-edge/bionic-updates,bionic-security 5.3.0.53.110 amd64

# 安装高版本内核
apt-get install linux-generic-hwe-18.04-edge

# 重启
reboot
3、编译并发布程序
#ceph-0002
#安装所需包
apt install pkg-config libglib2.0-dev librbd1 libnl-3-200 libkmod2

#python2
pip install kmod pyudev urwid pyparsing rados rbd netifaces crypto requests  flask
#缺少两个包,暂时没有影响
#pip install gobject, python-openssl

#python3
apt-get install python3-pip python3-dev python3-openssl
apt install python-dev python3-pyparsing
pip3 install gobject  pyudev urwid pyparsing netifaces crypto requests  flask
#缺少三个包,暂时没有影响
#pip3 install kmod rados rbd

#tcmu-runner
git clone https://github.com/open-iscsi/tcmu-runner
#修改脚本,extra/install_dep.sh,在debianh后增加",ubuntu",让ubuntu与debian相同处理即可
./extra/install_dep.sh
cmake -Dwith-glfs=false -Dwith-qcow=false -DSUPPORT_SYSTEMD=ON -DCMAKE_INSTALL_PREFIX=/usr
make install

#rtslib-fb
git clone https://github.com/open-iscsi/rtslib-fb.git
cd rtslib-fb
python setup.py install

#configshell-fb
git clone https://github.com/open-iscsi/configshell-fb.git
cd configshell-fb
python setup.py install

#targetcli-fb
git clone https://github.com/open-iscsi/targetcli-fb.git
cd targetcli-fb
python setup.py install
mkdir /etc/target
mkdir /var/target

#ceph-iscsi
git clone https://github.com/ceph/ceph-iscsi.git
cd ceph-iscsi
python setup.py install --install-scripts=/usr/bin
cp usr/lib/systemd/system/rbd-target-gw.service /lib/systemd/system
cp usr/lib/systemd/system/rbd-target-api.service /lib/systemd/system

#启动服务
systemctl daemon-reload
systemctl enable tcmu-runner
systemctl start tcmu-runner
systemctl enable rbd-target-gw
systemctl start rbd-target-gw
systemctl enable rbd-target-api
systemctl start rbd-target-api
4、修改配置文件
#ceph-0002
vi /etc/ceph/iscsi-gateway.cfg
[config]
# Name of the Ceph storage cluster. A suitable Ceph configuration file allowing
# access to the Ceph storage cluster from the gateway node is required, if not
# colocated on an OSD node.
cluster_name = ceph
pool = rbd
# cluster_client_name = client.igw.ceph-0002
minimum_gateways = 1
gateway_ip_list = 192.168.1.102,192.168.1.103

# Place a copy of the ceph cluster's admin keyring in the gateway's /etc/ceph
# drectory and reference the filename here
gateway_keyring = ceph.client.admin.keyring

# API settings.
# The API supports a number of options that allow you to tailor it to your
# local environment. If you want to run the API under https, you will need to
# create cert/key files that are compatible for each iSCSI gateway node, that is
# not locked to a specific node. SSL cert and key files *must* be called
# 'iscsi-gateway.crt' and 'iscsi-gateway.key' and placed in the '/etc/ceph/' directory
# on *each* gateway node. With the SSL files in place, you can use 'api_secure = true'
# to switch to https mode.

# To support the API, the bear minimum settings are:
api_secure = false

# Additional API configuration options are as follows, defaults shown.
# api_user = admin
# api_password = admin
# api_port = 5001
# trusted_ip_list = 192.168.1.101,192.168.1.102,192.168.1.103,192.168.1.104
5、将节点加入监控
#ceph-0001
ceph dashboard iscsi-gateway-list
{"gateways": {}}

ceph dashboard iscsi-gateway-add http://admin:admin@ceph-0002:5000
Success

ceph dashboard iscsi-gateway-list
{"gateways": {"localhost.vm": {"service_url": "http://admin:admin@ceph-0002:5000"}}}

# 这个localhost.vm要记住
6、配置iscsi
#ceph-0004
gwcli

# 创建gateway
> /> cd /iscsi-target
> /iscsi-target...-igw/gateways> create localhost.vm 192.168.1.102 skipchecks=true
OS version/package checks have been bypassed
Adding gateway, sync'ing 0 disk(s) and 0 client(s)
ok

> /iscsi-target...-igw/gateways> ls
o- gateways ......................... [Up: 1/1, Portals: 1]
o- localhost.vm ..................... [192.168.1.102 (UP)]

# 挂载硬盘
> /iscsi-target...-igw/gateways> cd /disks
> /disks> attach rbd/r2
ok

> /disks> ls
o- disks ............................... [1G, Disks: 1]
o- rbd ..................................... [rbd (1G)]
o- r2 ................................... [rbd/r2 (1G)]
> /disks> attach rbd/r4
ok
> /disks> ls
o- disks ............................... [2G, Disks: 2]
o- rbd ..................................... [rbd (2G)]
o- r2 ................................... [rbd/r2 (1G)]
o- r4 ................................... [rbd/r4 (1G)]

#授权管理
> /iscsi-targets> cd iqn.2020-06.com.neohope.iscsi-gw:iscsi-igw/
> /iscsi-target...-gw:iscsi-igw> ls
o- iqn.2020-06.com.neohope.iscsi-gw:iscsi-igw ...[Auth: None, Gateways: 1]
o- disks ..................................... [Disks: 0]
o- gateways ....................... [Up: 1/1, Portals: 1]
| o- localhost.vm .................. [192.168.1.102 (UP)]
o- host-groups ............................. [Groups : 0]
o- hosts .................. [Auth: ACL_ENABLED, Hosts: 0]

# 创建initiator
> /iscsi-target...-gw:iscsi-igw> cd hosts
> /iscsi-target...csi-igw/hosts> create iqn.2020-06.com.neohope:ceph-0004
ok

> /iscsi-target...ope:ceph-0004> ls
o- iqn.2020-06.com.neohope:ceph-0004 ... [Auth: None, Disks: 0(0.00Y)]

# 创建授权
> /iscsi-target...ope:ceph-0004> auth username=myissicuid password=myissicpwdpwd
ok

# 分配硬盘
> /iscsi-target...ope:ceph-0004> disk add rbd/r2
ok

> /iscsi-target...ope:ceph-0004> ls
o- iqn.2020-06.com.neohope:ceph-0004 ......... [Auth: CHAP, Disks: 1(1G)]
o- lun 0 .............................. [rbd/r2(1G), Owner: localhost.vm]
7、挂载iscsi盘
#ceph-0004

#安装需要的软件
apt-get install open-iscsi

#查看可用的iscsi服务
iscsiadm -m discovery -t sendtargets -p 192.168.1.102
192.168.1.102:3260,1 iqn.2020-06.com.neohope.iscsi-gw:iscsi-igw

#修改配置文件,initiator要和上面分配的一致
vim /etc/iscsi/initiatorname.iscsi
InitiatorName=iqn.2020-06.com.neohope:ceph-0004

#重启服务
systemctl status iscsid

#设置登录信息
iscsiadm -m node -T iqn.2020-06.com.neohope.iscsi-gw:iscsi-igw-o update --name node.session.auth.authmethod --value=CHAP
iscsiadm: No records found

iscsiadm -m node -T iqn.2020-06.com.neohope.iscsi-gw:iscsi-igw --op update --name node.session.auth.username --value=myissicuid

iscsiadm -m node -T iqn.2020-06.com.neohope.iscsi-gw:iscsi-igw --op update --name node.session.auth.password --value=myissicpwdpwd

#登录,挂载iscsi盘
iscsiadm -m node -T iqn.2020-06.com.neohope.iscsi-gw:iscsi-igw --login
Logging in to [iface: default, target: iqn.2020-06.com.neohope.iscsi-gw:iscsi-igw, portal: 192.168.1.102,3260] (multiple)
Login to [iface: default, target: iqn.2020-06.com.neohope.iscsi-gw:iscsi-igw, portal: 192.168.1.102,3260] successful.
8、使用iscsi盘
#ceph-0004

#查看硬盘,会发现多出一块
fdisk -l
Disk /dev/vda: 40 GiB, 42949672960 bytes, 83886080 sectors
Disk /dev/vdb: 20 GiB, 21474836480 bytes, 41943040 sectors
Disk /dev/mapper/ceph--44634c9f--cf41--4215--bd5b--c2db93659bf1-osd--block--b192f8e5--55f2--4e75--a7ce--54d007410829: 20 GiB, 21470642176 bytes, 41934848 sectors
Disk /dev/sda: 1 GiB, 1073741824 bytes, 2097152 sectors

#查看sda硬盘情况
fdisk -l /dev/sda
Disk /dev/sda: 1 GiB, 1073741824 bytes, 2097152 sectors
Units: sectors of 1 * 512 = 512 bytes
Sector size (logical/physical): 512 bytes / 512 bytes
I/O size (minimum/optimal): 512 bytes / 512 bytes
root@ceph-0004:/dev# fdisk -l /dev/sda
Disk /dev/sda: 1 GiB, 1073741824 bytes, 2097152 sectors
Units: sectors of 1 * 512 = 512 bytes
Sector size (logical/physical): 512 bytes / 512 bytes
I/O size (minimum/optimal): 512 bytes / 512 bytes

#格式化
sudo mkfs.ext4 -m0 /dev/sda
mke2fs 1.44.1 (24-Mar-2018)
Creating filesystem with 262144 4k blocks and 65536 inodes
Filesystem UUID: 42229c39-e23c-46b2-929d-469e66196498
Superblock backups stored on blocks:
32768, 98304, 163840, 229376
Allocating group tables: done
Writing inode tables: done
Creating journal (8192 blocks): done
Writing superblocks and filesystem accounting information: done

#挂载
mount -t ext4 /dev/sda /mnt/iscsi

#基本操作
cd /mnt/iscsi/
ls
vi iscis.txt
ls
9、卸载iscsi盘
#ceph-0004

#取消mount
umount /mnt/iscsi

#登出
iscsiadm -m node -T iqn.2020-06.com.neohope.iscsi-gw:iscsi-igw  --logout
Logging out of session [sid: 1, target: iqn.2020-06.com.neohope.iscsi-gw:iscsi-igw, portal: 192.168.1.102,3260]
Logout of [sid: 1, target: iqn.2020-06.com.neohope.iscsi-gw:iscsi-igw, portal: 192.168.1.102,3260] successful.

#查看硬盘列表,会发现iscsi盘已经不见了
fdisk -l
本节主要是将rbd(也就是块存储),通过tgt映射为iscsi(也就是ip san),从而提供给其他系统使用。
1、安装需要的软件
#ceph-0002
apt-get install tgt
apt-get install open-iscsi
2、查看tgt对rbd的支持情况
#ceph-0002
tgtadm --lld iscsi --op show --mode system
System:
  State: ready
  debug: off
LLDs:
  iscsi: ready
  iser: error
  Backing stores:
  sheepdog
  bsg
  sg
  null
  ssc
  smc (bsoflags sync:direct)
  mmc (bsoflags sync:direct)
  rdwr (bsoflags sync:direct)
  aio
Device types:
  disk
  cd/dvd
  osd
  controller
  changer
  tape
  passthrough
iSNS:
  iSNS=Off
  iSNSServerIP=
  iSNSServerPort=3205
  iSNSAccessControl=Off
可见当前版本的tgt不支持直接使用rbd,所以要先将rbd映射为硬盘后,再进行处理。
3、创建并映射rbd设备
#ceph-0002
#创建块存储
rbd create --size 1024 rbd/r2

#禁用特性
rbd feature disable r2 object-map fast-diff deep-flatten

#映射r2设备
rbd map r2
/dev/rbd0

#查看映射情况
rbd showmapped
id pool image snap device
0  rbd  r2    -    /dev/rbd0
4、修改tgt配置文件
#ceph-0002
vim /etc/tgt/targets.conf
<target iqn.2020-06.com.neohope:iscsi="">
  backing-store  /dev/rbd0             #虚拟设备
  initiator-address 192.168.1.0/24     #IP限制,请根据实际需要配置
  # incominguser iuid ipwd             #授权限制,请根据实际需要配置
  write-cache off                      #关闭缓存,请根据实际需要配置
</target>

# 重启服务,配置生效
systemctl restart tgt.service

# 查看tgt情况
tgt-admin –-show
Target 1: iqn.2020-06.com.neohope:iscsi
System information:
  Driver: iscsi
  State: ready
I_T nexus information:
LUN information:
  LUN: 0
    Type: controller
    SCSI ID: IET     00010000
    SCSI SN: beaf10
    Size: 0 MB, Block size: 1
    Online: Yes
    Removable media: No
    Prevent removal: No
    Readonly: No
    SWP: No
    Thin-provisioning: No
    Backing store type: null
    Backing store path: None
    Backing store flags:
  LUN: 1
    Type: disk
    SCSI ID: IET     00010001
    SCSI SN: beaf11
    Size: 1074 MB, Block size: 512
    Online: Yes
    Removable media: No
    Prevent removal: No
    Readonly: No
    SWP: No
    Thin-provisioning: No
    Backing store type: rdwr
    Backing store path: /dev/rbd0
    Backing store flags:
Account information:
ACL information:
  192.168.1.0/24
5、挂载iscsi盘
#ceph-0004
#安装需要的软件
apt-get install open-iscsi

#查看可用的iscsi服务
iscsiadm -m discovery -t sendtargets -p 192.168.1.102:3260
192.168.1.102:3260,1 iqn.2020-06.com.neohope:iscsi

#登录,挂载iscsi盘
iscsiadm -m node -T iqn.2020-06.com.neohope:iscsi --login
Logging in to [iface: default, target: iqn.2020-06.com.neohope:iscsi, portal: 192.168.1.102,3260] (multiple)
Login to [iface: default, target: iqn.2020-06.com.neohope:iscsi, portal: 192.168.1.102,3260] successful.
6、使用iscsi盘
#ceph-0004

#查看硬盘,会发现多出一块
fdisk -l
Disk /dev/vda: 40 GiB, 42949672960 bytes, 83886080 sectors
Disk /dev/vdb: 20 GiB, 21474836480 bytes, 41943040 sectors
Disk /dev/mapper/ceph--44634c9f--cf41--4215--bd5b--c2db93659bf1-osd--block--b192f8e5--55f2--4e75--a7ce--54d007410829: 20 GiB, 21470642176 bytes, 41934848 sectors
Disk /dev/sda: 1 GiB, 1073741824 bytes, 2097152 sectors

#查看sda硬盘情况
fdisk -l /dev/sda
Disk /dev/sda: 1 GiB, 1073741824 bytes, 2097152 sectors
Units: sectors of 1 * 512 = 512 bytes
Sector size (logical/physical): 512 bytes / 512 bytes
I/O size (minimum/optimal): 512 bytes / 512 bytes
root@ceph-0004:/dev# fdisk -l /dev/sda
Disk /dev/sda: 1 GiB, 1073741824 bytes, 2097152 sectors
Units: sectors of 1 * 512 = 512 bytes
Sector size (logical/physical): 512 bytes / 512 bytes
I/O size (minimum/optimal): 512 bytes / 512 bytes

#格式化
sudo mkfs.ext4 -m0 /dev/sda
mke2fs 1.44.1 (24-Mar-2018)
Creating filesystem with 262144 4k blocks and 65536 inodes
Filesystem UUID: 42229c39-e23c-46b2-929d-469e66196498
Superblock backups stored on blocks:
32768, 98304, 163840, 229376
Allocating group tables: done
Writing inode tables: done
Creating journal (8192 blocks): done
Writing superblocks and filesystem accounting information: done

#挂载
mount -t ext4 /dev/sda /mnt/iscsi

#基本操作
cd /mnt/iscsi/
ls
vi iscis.txt
ls
7、卸载iscsi盘
#取消mount
umount /mnt/iscsi

#登出
iscsiadm -m node -T iqn.2020-06.com.neohope:iscsi  --logout
Logging out of session [sid: 1, target: iqn.2020-06.com.neohope:iscsi, portal: 192.168.1.102,3260]
Logout of [sid: 1, target: iqn.2020-06.com.neohope:iscsi, portal: 192.168.1.102,3260] successful.

#查看硬盘列表,会发现iscsi盘已经不见了
fdisk -l
本节主要是使用ganesha将cephfs和rgw,映射为nfs,从而提供给其他系统使用。
0、原本计划使用容器继续处理,但没能成功,如果你成功了麻烦告诉我一下如何做的。
#这条路没测试成功,原理上应该是一样的
ceph orch apply nfs mynfs nfspool --placement="1 ceph-0003"
后面是通过编译源码的方式来完成的,操作系统是Ubuntu18.0.4,由于没有高版本的librgw的开发库(Ubuntu18.0.4只有1.1.6,而ganesha却要1.1.7以上),所以最后没能支持rgw,只能支持cephfs:
1、安装所需包
#ceph-0003
apt-get install gcc git cmake autoconf libtool bison flex
apt-get install libssl-dev  libnfs-dev doxygen libgssglue-dev libkrb5-dev liburcu-dev libntirpc-dev
apt-get install libnfsidmap-dev uuid-dev libblkid-dev
apt-get install librados-dev librgw-dev libcephfs-dev nfs-ganesha-ceph
snap install cmake  --classic
#缺少libzardfs_client,webclient,暂时没有影响
2、下载源码
#ceph-0003
git clone https://github.com/nfs-ganesha/nfs-ganesha.git
cd nfs-ganesha
git checkout V3.2
git submodule update --init --recursive
3、编译
#ceph-0003
mkdir build
cd build

#这里要把rgw的自持去掉,否则无法通过
ccmake ../src
>config
>generate

make
make install
4、创建ganesha配置文件
# ceph-0003
# 配置文件是支持cephfs和rgw的
vi /etc/ganesha/ganesha.conf
NFS_CORE_PARAM {
        Enable_NLM = false;
        Enable_RQUOTA = false;
        Protocols = 4;
        NFS_Port = 2049;
}

NFSv4 {
        Delegations = false;
        Minor_Versions = 1, 2;
}

CACHEINODE {
        Dir_Chunk = 0;
        NParts = 1;
        Cache_Size = 1;
}

EXPORT_DEFAULTS {
        Attr_Expiration_Time = 0;
}

EXPORT {
    Export_ID = 1001;
    Protocols = 3,4;
    Path = /;
    Pseudo = /cephfs;
    Access_Type = RW;
    #Transport_Protocols = TCP;
    Squash = Root_squash;
    FSAL {
        Name = CEPH;
    }
}

EXPORT
{
    Export_ID=1002;
    NFS_Protocols = 3,4;
    Path = "/";
    Pseudo = /rgw;
    Access_Type = RW;
    #Transport_Protocols = TCP;
    Squash = Root_squash;

    FSAL {
        Name = RGW;
        User_Id = "s3user";
        Access_Key_Id ="J5IWQUN50UJHVH48461Q";
        Secret_Access_Key = "5fgLtqd07EI6LS3PamPVNBpqwPPfPYJNxULBlgpj";
    }
}

LOG {
    Facility {
        name = FILE;
        destination = "/var/log/ganesha/ganesha.log";
        enable = active;
    }
}

CEPH {
    ceph_conf = '/etc/ceph/ceph.conf';
    cluster = "ceph";
    name = "rgw.myrealm.myzone";
}

RGW {
    ceph_conf = "/etc/ceph/ceph.conf";
}
5、运行ganesha
ganesha.nfsd -f /etc/ganesha/ganesha.conf -L /var/log/ganesha/ganesha.log -N NIV_INFO
6、挂载
#ceph-0004
mount -t nfs4 ceph-0003:/cephfs  /mnt/nfs/

ls /mnt/nfs
fuse.txt  volumes

cat /mnt/nfs/fuse.txt
fuse

ls /mnt/nfs/volumes/
subvg01  subvg02
7、取消挂载
#ceph-0004
umount /mnt/nfs
8、补充:
前面傻了,只用了ubuntu的源,忘记使用ceph的源了。其实用ceph的源后,就可以解决问题了,操作和上面相同,编译方式如下:
#添加ceph源
wget -q -O- 'https://download.ceph.com/keys/release.asc' | sudo apt-key add -
sudo apt-add-repository 'deb https://download.ceph.com/debian-octopus/ bionic main'
sudo apt-get update

#安装需要的软件
apt-get install gcc git cmake autoconf libtool bison flex
apt-get install libssl-dev  libnfs-dev doxygen libgssglue-dev libkrb5-dev liburcu-dev libntirpc-dev
apt-get install libnfsidmap-dev uuid-dev libblkid-dev
apt-get install librados-dev librgw-dev libcephfs-dev nfs-ganesha-ceph
snap install cmake  --classic
#缺少libzardfs_client,webclient,暂时没有影响

#下载源码并编译
git clone https://github.com/nfs-ganesha/nfs-ganesha.git
git checkout V3.2
git submodule update --init --recursive

mkdir build
cd build
ccmake ../src

make
make install