常用docker镜像命令(Compose)

1、拉取镜像

#ubuntu-16.04.1-server-amd64
sudo apt-get install docker
sudo apt-get install docker-compose
#拉取镜像
sudo docker pull mysql:5.7
sudo docker pull redis:3.2
sudo docker pull mongo:3.4
sudo docker pull jetty:9.3-jre8
sudo docker pull nginx:1.11
sudo docker pull elasticsearch:5.1
sudo docker pull ubuntu:16.04

2、新建网络

sudo docker network create hiup

3、整理yml文件
3.1yml版本1

h01-mysql02:
  image: mysql:5.7
  mem_limit: 128m
  cpu_shares: 100
  tty: true
  hostname: h01-mysql02
  net: hiup
  ports:
    - "3306:3306"
  volumes:
   - /home/hiup/docker/data/mysql/var/lib/mysql:/var/lib/mysql
   - /home/hiup/docker/data/mysql/etc/mysql/conf.d:/etc/mysql/conf.d
  environment:
   - MYSQL_ROOT_PASSWORD=hiup
  log_driver: "json-file"
  log_opt:
    max-size: "10m"
    max-file: "10"

h01-redis02:
  image: redis:3.2
  mem_limit: 128m
  cpu_shares: 100
  tty: true
  hostname: h01-redis02
  net: hiup
  volumes:
   - /home/hiup/docker/data/redis/etc/redis/:/etc/redis/
   - /home/hiup/docker/data/redis/data:/data
  ports:
   - "6379:6379"
  command: redis-server /etc/redis/redis.conf
  log_driver: "json-file"
  log_opt:
    max-size: "10m"
    max-file: "10"

h01-mongo02:
  image: mongo:3.4
  mem_limit: 128m
  cpu_shares: 100
  tty: true
  hostname: h01-mongo02
  net: hiup
  ports:
   - "27017:27017"
  volumes:
   - /home/hiup/docker/data/mongo/etc/mongod.conf:/etc/mongod.conf
   - /home/hiup/docker/data/mongo/data/db:/data/db
  log_driver: "json-file"
  log_opt:
    max-size: "10m"
    max-file: "10"

h01-jetty02:
  image: jetty:9.3-jre8
  mem_limit: 128m
  cpu_shares: 100
  tty: true
  hostname: h01-jetty02
  net: hiup
  ports:
   - "8080:8080"
  volumes:
   - /home/hiup/docker/data/jetty/usr/local/jetty/etc:/usr/local/jetty/etc
   - /home/hiup/docker/data/jetty/webapps:/var/lib/jetty/webapps
  log_driver: "json-file"
  log_opt:
    max-size: "10m"
    max-file: "10"

h01-nginx02:
  image: nginx:1.11
  mem_limit: 128m
  cpu_shares: 100
  tty: true
  hostname: h01-nginx02
  net: hiup
  ports:
   - "80:80"
  volumes:
   - /home/hiup/docker/data/nginx/etc/nginx/nginx.conf:/etc/nginx/nginx.conf
   - /home/hiup/docker/data/nginx/usr/share/nginx/html:/usr/share/nginx/html
  log_driver: "json-file"
  log_opt:
    max-size: "10m"
    max-file: "10"

h01-es02:
  image: elasticsearch:5.1
  mem_limit: 640m
  cpu_shares: 100
  tty: true
  hostname: h01-es02
  net: hiup
  ports:
   - "9200:9200"
   - "9300:9300"
  volumes:
   - /home/hiup/docker/data/es/usr/share/elasticsearch/config:/usr/share/elasticsearch/config
   - /home/hiup/docker/data/es/usr/share/elasticsearch/data:/usr/share/elasticsearch/data
  command: elasticsearch
  log_driver: "json-file"
  log_opt:
    max-size: "10m"
    max-file: "10"

h01-ubuntu02:
  image: ubuntu:16.04
  mem_limit: 128m
  cpu_shares: 100
  tty: true
  hostname: h01-ubuntu02
  net: hiup
  #ports:
  #volumes:
  command: /bin/bash
  log_driver: "json-file"
  log_opt:
    max-size: "10m"
    max-file: "10"

3.2yml版本2

version: '2'
services:
  h01-mysql02:
    image: mysql:5.7
    mem_limit: 128m
    cpu_shares: 100
    tty: true
    hostname: h01-mysql02
    network_mode: hiup
    ports:
      - "3306:3306"
    volumes:
     - /home/hiup/docker/data/mysql/var/lib/mysql:/var/lib/mysql
     - /home/hiup/docker/data/mysql/etc/mysql/conf.d:/etc/mysql/conf.d
    environment:
     - MYSQL_ROOT_PASSWORD=hiup
    logging:
      driver: "json-file"
      options:
        max-size: "10m"
        max-file: "10"
  
  h01-redis02:
    image: redis:3.2
    mem_limit: 128m
    cpu_shares: 100
    tty: true
    hostname: h01-redis02
    network_mode: hiup
    volumes:
     - /home/hiup/docker/data/redis/etc/redis/:/etc/redis/
     - /home/hiup/docker/data/redis/data:/data
    ports:
     - "6379:6379"
    command: redis-server /etc/redis/redis.conf
    logging:
      driver: "json-file"
      options:
        max-size: "10m"
        max-file: "10"
  
  h01-mongo02:
    image: mongo:3.4
    mem_limit: 128m
    cpu_shares: 100
    tty: true
    hostname: h01-mongo02
    network_mode: hiup
    ports:
     - "27017:27017"
    volumes:
     - /home/hiup/docker/data/mongo/etc/mongod.conf:/etc/mongod.conf
     - /home/hiup/docker/data/mongo/data/db:/data/db
    logging:
      driver: "json-file"
      options:
        max-size: "10m"
        max-file: "10"
  
  h01-jetty02:
    image: jetty:9.3-jre8
    mem_limit: 128m
    cpu_shares: 100
    tty: true
    hostname: h01-jetty02
    network_mode: hiup
    ports:
     - "8080:8080"
    volumes:
     - /home/hiup/docker/data/jetty/usr/local/jetty/etc:/usr/local/jetty/etc
     - /home/hiup/docker/data/jetty/webapps:/var/lib/jetty/webapps
    logging:
      driver: "json-file"
      options:
        max-size: "10m"
        max-file: "10"
  
  h01-nginx02:
    image: nginx:1.11
    mem_limit: 128m
    cpu_shares: 100
    tty: true
    hostname: h01-nginx02
    network_mode: hiup
    ports:
     - "80:80"
    volumes:
     - /home/hiup/docker/data/nginx/etc/nginx/nginx.conf:/etc/nginx/nginx.conf
     - /home/hiup/docker/data/nginx/usr/share/nginx/html:/usr/share/nginx/html
    logging:
      driver: "json-file"
      options:
        max-size: "10m"
        max-file: "10"
  
  h01-es02:
    image: elasticsearch:5.1
    mem_limit: 640m
    cpu_shares: 100
    tty: true
    hostname: h01-es02
    network_mode: hiup
    ports:
     - "9200:9200"
     - "9300:9300"
    volumes:
     - /home/hiup/docker/data/es/usr/share/elasticsearch/config:/usr/share/elasticsearch/config
     - /home/hiup/docker/data/es/usr/share/elasticsearch/data:/usr/share/elasticsearch/data
    command: elasticsearch
    logging:
      driver: "json-file"
      options:
        max-size: "10m"
        max-file: "10"
  
  h01-ubuntu02:
    image: ubuntu:16.04
    mem_limit: 128m
    cpu_shares: 100
    tty: true
    hostname: h01-ubuntu02
    network_mode: hiup
    ports:
    volumes:
    command: /bin/bash
    logging:
      driver: "json-file"
      options:
        max-size: "10m"
        max-file: "10"

4、运行

sudo docker-compose up -d

5、配置文件目录

.
├── es
│   └── usr
│       └── share
│           └── elasticsearch
│               ├── config
│               │   ├── elasticsearch.yml
│               │   ├── log4j2.properties
│               │   └── scripts
│               └── data
│                   └── nodes
│                       └── 0
│                           ├── node.lock
│                           └── _state
│                               ├── global-0.st
│                               └── node-0.st
├── jetty
│   ├── usr
│   │   └── local
│   │       └── jetty
│   │           └── etc
│   │               ├── example-quickstart.xml
│   │               ├── gcloud-memcached-session-context.xml
│   │               ├── gcloud-session-context.xml
│   │               ├── hawtio.xml
│   │               ├── home-base-warning.xml
│   │               ├── jamon.xml
│   │               ├── jdbcRealm.properties
│   │               ├── jetty-alpn.xml
│   │               ├── jetty-annotations.xml
│   │               ├── jetty-cdi.xml
│   │               ├── jetty.conf
│   │               ├── jetty-debuglog.xml
│   │               ├── jetty-debug.xml
│   │               ├── jetty-deploy.xml
│   │               ├── jetty-gcloud-memcached-sessions.xml
│   │               ├── jetty-gcloud-session-idmgr.xml
│   │               ├── jetty-gcloud-sessions.xml
│   │               ├── jetty-gzip.xml
│   │               ├── jetty-http2c.xml
│   │               ├── jetty-http2.xml
│   │               ├── jetty-http-forwarded.xml
│   │               ├── jetty-https.xml
│   │               ├── jetty-http.xml
│   │               ├── jetty-infinispan.xml
│   │               ├── jetty-ipaccess.xml
│   │               ├── jetty-jaas.xml
│   │               ├── jetty-jdbc-sessions.xml
│   │               ├── jetty-jmx-remote.xml
│   │               ├── jetty-jmx.xml
│   │               ├── jetty-logging.xml
│   │               ├── jetty-lowresources.xml
│   │               ├── jetty-monitor.xml
│   │               ├── jetty-nosql.xml
│   │               ├── jetty-plus.xml
│   │               ├── jetty-proxy-protocol-ssl.xml
│   │               ├── jetty-proxy-protocol.xml
│   │               ├── jetty-proxy.xml
│   │               ├── jetty-requestlog.xml
│   │               ├── jetty-rewrite-customizer.xml
│   │               ├── jetty-rewrite.xml
│   │               ├── jetty-setuid.xml
│   │               ├── jetty-spring.xml
│   │               ├── jetty-ssl-context.xml
│   │               ├── jetty-ssl.xml
│   │               ├── jetty-started.xml
│   │               ├── jetty-stats.xml
│   │               ├── jetty-threadlimit.xml
│   │               ├── jetty.xml
│   │               ├── jminix.xml
│   │               ├── jolokia.xml
│   │               ├── krb5.ini
│   │               ├── README.spnego
│   │               ├── rewrite-compactpath.xml
│   │               ├── spnego.conf
│   │               ├── spnego.properties
│   │               └── webdefault.xml
│   └── webapps
│       └── jvmjsp.war
├── mongo
│   ├── data
│   │   └── db
│   │       ├── collection-0-4376730799513530636.wt
│   │       ├── collection-2-4376730799513530636.wt
│   │       ├── collection-5-4376730799513530636.wt
│   │       ├── diagnostic.data
│   │       │   └── metrics.2016-12-27T08-57-50Z-00000
│   │       ├── index-1-4376730799513530636.wt
│   │       ├── index-3-4376730799513530636.wt
│   │       ├── index-4-4376730799513530636.wt
│   │       ├── index-6-4376730799513530636.wt
│   │       ├── journal
│   │       │   ├── WiredTigerLog.0000000001
│   │       │   ├── WiredTigerPreplog.0000000001
│   │       │   └── WiredTigerPreplog.0000000002
│   │       ├── _mdb_catalog.wt
│   │       ├── mongod.lock
│   │       ├── sizeStorer.wt
│   │       ├── storage.bson
│   │       ├── WiredTiger
│   │       ├── WiredTigerLAS.wt
│   │       ├── WiredTiger.lock
│   │       ├── WiredTiger.turtle
│   │       └── WiredTiger.wt
│   └── etc
│       └── mongod.conf
├── mysql
│   ├── etc
│   │   └── mysql
│   │       └── conf.d
│   │           ├── docker.cnf
│   │           └── mysql.cnf
│   └── var
│       └── lib
│           └── mysql
│               ├── auto.cnf
│               ├── ib_buffer_pool
│               ├── ibdata1
│               ├── ib_logfile0
│               ├── ib_logfile1
│               ├── mysql [error opening dir]
│               ├── performance_schema [error opening dir]
│               └── sys [error opening dir]
├── nginx
│   ├── etc
│   │   └── nginx
│   │       └── nginx.conf
│   └── usr
│       └── share
│           └── nginx
│               └── html
│                   ├── 50x.html
│                   └── index.html
└── redis
    ├── data
    │   └── dump.rdb
    └── etc
        └── redis
            ├── redis.conf
            └── sentinel.conf

6、本地工具安装

sudo apt-get install mysql-client
sudo apt-get install redis-tools
sudo apt-get install mongodb-clients
sudo apt-get install curl
常用docker镜像命令(Shell)

1、拉取镜像

#ubuntu-16.04.1-server-amd64
sudo apt-get install docker
sudo apt-get install docker-compose
#拉取镜像
sudo docker pull mysql:5.7
sudo docker pull redis:3.2
sudo docker pull mongo:3.4
sudo docker pull jetty:9.3-jre8
sudo docker pull nginx:1.11
sudo docker pull elasticsearch:5.1
sudo docker pull ubuntu:16.04

2、新建网络

sudo docker network create hiup

3、启动容器
3.1、第一次启动容器

#mysql
sudo docker run --net=hiup --name h01-mysql01 -h h01-mysql01 -p3306:3306 -c 100 -m 128m -e MYSQL_ROOT_PASSWORD=hiup -v /home/hiup/docker/data/mysql/var/lib/mysql:/var/lib/mysql -v /home/hiup/docker/data/mysql/etc/mysql/conf.d:/etc/mysql/conf.d -itd mysql:5.7

#redis
sudo docker run --net=hiup --name h01-redis01 -h h01-redis01 -p6379:6379 -c 100 -m 128m  -v /home/hiup/docker/data/redis/etc/redis/:/etc/redis/ -v /home/hiup/docker/data/redis/data:/data -itd redis:3.2 redis-server /etc/redis/redis.conf
#下面配置提供持久化支持
#redis-server --appendonly yes

#mongodb
sudo docker run --net=hiup --name h01-mongo01 -h h01-mongo01 -p27017:27017 -c 100 -m 128m -v /home/hiup/docker/data/mongo/etc/mongod.conf:/etc/mongod.conf -v /home/hiup/docker/data/mongo/data/db:/data/db -itd mongo:3.4
#提供授权支持
#--auth

#jetty
sudo docker run --net=hiup --name h01-jetty01 -h h01-jetty01 -p8080:8080 -c 100 -m 128m -v /home/hiup/docker/data/jetty/usr/local/jetty/etc:/usr/local/jetty/etc -v /home/hiup/docker/data/jetty/webapps:/var/lib/jetty/webapps -itd jetty:9.3-jre8
#默认环境变量
#JETTY_HOME    =  /usr/local/jetty
#JETTY_BASE    =  /var/lib/jetty
#TMPDIR        =  /tmp/jetty
#Deploy dir is /var/lib/jetty/webapps
#内存设置
#-e JAVA_OPTIONS="-Xmx1g"
#参数列表
#--list-config

#nginx
sudo docker run --net=hiup --name h01-nginx01 -h h01-nginx01 -p80:80 -c 100 -m 128m -v /home/hiup/docker/data/nginx/etc/nginx/nginx.conf:/etc/nginx/nginx.conf -v /home/hiup/docker/data/nginx/usr/share/nginx/html:/usr/share/nginx/html -itd nginx:1.11

#elasticsearch
sudo docker run --net=hiup --name h01-es01 -h h01-es01 -p9200:9200 -p9300:9300 -c 100 -m 640m -v /home/hiup/docker/data/es/usr/share/elasticsearch/config:/usr/share/elasticsearch/config -v /home/hiup/docker/data/es/usr/share/elasticsearch/data:/usr/share/elasticsearch/data -itd elasticsearch:5.1

#ubuntu
sudo docker run --net=hiup --name h01-ubuntu01 -h h01-ubuntu01 -c 100 -m 128m -itd ubuntu:16.04
sudo docker attach h01-ubuntu01

3.2、第n次启动容器(n>1)

sudo docker start h01-mysql01
sudo docker start h01-redis01
sudo docker start h01-mongo01
sudo docker start h01-jetty01
sudo docker start h01-nginx01
sudo docker start h01-es01
sudo docker start h01-ubuntu01

4、配置文件目录

.
├── es
│   └── usr
│       └── share
│           └── elasticsearch
│               ├── config
│               │   ├── elasticsearch.yml
│               │   ├── log4j2.properties
│               │   └── scripts
│               └── data
│                   └── nodes
│                       └── 0
│                           ├── node.lock
│                           └── _state
│                               ├── global-0.st
│                               └── node-0.st
├── jetty
│   ├── usr
│   │   └── local
│   │       └── jetty
│   │           └── etc
│   │               ├── example-quickstart.xml
│   │               ├── gcloud-memcached-session-context.xml
│   │               ├── gcloud-session-context.xml
│   │               ├── hawtio.xml
│   │               ├── home-base-warning.xml
│   │               ├── jamon.xml
│   │               ├── jdbcRealm.properties
│   │               ├── jetty-alpn.xml
│   │               ├── jetty-annotations.xml
│   │               ├── jetty-cdi.xml
│   │               ├── jetty.conf
│   │               ├── jetty-debuglog.xml
│   │               ├── jetty-debug.xml
│   │               ├── jetty-deploy.xml
│   │               ├── jetty-gcloud-memcached-sessions.xml
│   │               ├── jetty-gcloud-session-idmgr.xml
│   │               ├── jetty-gcloud-sessions.xml
│   │               ├── jetty-gzip.xml
│   │               ├── jetty-http2c.xml
│   │               ├── jetty-http2.xml
│   │               ├── jetty-http-forwarded.xml
│   │               ├── jetty-https.xml
│   │               ├── jetty-http.xml
│   │               ├── jetty-infinispan.xml
│   │               ├── jetty-ipaccess.xml
│   │               ├── jetty-jaas.xml
│   │               ├── jetty-jdbc-sessions.xml
│   │               ├── jetty-jmx-remote.xml
│   │               ├── jetty-jmx.xml
│   │               ├── jetty-logging.xml
│   │               ├── jetty-lowresources.xml
│   │               ├── jetty-monitor.xml
│   │               ├── jetty-nosql.xml
│   │               ├── jetty-plus.xml
│   │               ├── jetty-proxy-protocol-ssl.xml
│   │               ├── jetty-proxy-protocol.xml
│   │               ├── jetty-proxy.xml
│   │               ├── jetty-requestlog.xml
│   │               ├── jetty-rewrite-customizer.xml
│   │               ├── jetty-rewrite.xml
│   │               ├── jetty-setuid.xml
│   │               ├── jetty-spring.xml
│   │               ├── jetty-ssl-context.xml
│   │               ├── jetty-ssl.xml
│   │               ├── jetty-started.xml
│   │               ├── jetty-stats.xml
│   │               ├── jetty-threadlimit.xml
│   │               ├── jetty.xml
│   │               ├── jminix.xml
│   │               ├── jolokia.xml
│   │               ├── krb5.ini
│   │               ├── README.spnego
│   │               ├── rewrite-compactpath.xml
│   │               ├── spnego.conf
│   │               ├── spnego.properties
│   │               └── webdefault.xml
│   └── webapps
│       └── jvmjsp.war
├── mongo
│   ├── data
│   │   └── db
│   │       ├── collection-0-4376730799513530636.wt
│   │       ├── collection-2-4376730799513530636.wt
│   │       ├── collection-5-4376730799513530636.wt
│   │       ├── diagnostic.data
│   │       │   └── metrics.2016-12-27T08-57-50Z-00000
│   │       ├── index-1-4376730799513530636.wt
│   │       ├── index-3-4376730799513530636.wt
│   │       ├── index-4-4376730799513530636.wt
│   │       ├── index-6-4376730799513530636.wt
│   │       ├── journal
│   │       │   ├── WiredTigerLog.0000000001
│   │       │   ├── WiredTigerPreplog.0000000001
│   │       │   └── WiredTigerPreplog.0000000002
│   │       ├── _mdb_catalog.wt
│   │       ├── mongod.lock
│   │       ├── sizeStorer.wt
│   │       ├── storage.bson
│   │       ├── WiredTiger
│   │       ├── WiredTigerLAS.wt
│   │       ├── WiredTiger.lock
│   │       ├── WiredTiger.turtle
│   │       └── WiredTiger.wt
│   └── etc
│       └── mongod.conf
├── mysql
│   ├── etc
│   │   └── mysql
│   │       └── conf.d
│   │           ├── docker.cnf
│   │           └── mysql.cnf
│   └── var
│       └── lib
│           └── mysql
│               ├── auto.cnf
│               ├── ib_buffer_pool
│               ├── ibdata1
│               ├── ib_logfile0
│               ├── ib_logfile1
│               ├── mysql [error opening dir]
│               ├── performance_schema [error opening dir]
│               └── sys [error opening dir]
├── nginx
│   ├── etc
│   │   └── nginx
│   │       └── nginx.conf
│   └── usr
│       └── share
│           └── nginx
│               └── html
│                   ├── 50x.html
│                   └── index.html
└── redis
    ├── data
    │   └── dump.rdb
    └── etc
        └── redis
            ├── redis.conf
            └── sentinel.conf

5、本地工具安装

sudo apt-get install mysql-client
sudo apt-get install redis-cli
sudo apt-get install mongodb-clients
sudo apt-get install curl
Docker的几种联网方式

一、Docker联网常用概念
Port Expose:
标识image暴露某端口

Port Binding:
将虚拟机的端口,映射到宿主机的某端口

Linking:
contianer B link到container A,则B可以访问A

network:
虚拟机联网类型

二、Docker默认有以下几种联网方式:
none:无网络
host:与宿主机公用网卡
bridge:docker0做路由
container:容器共享,容器共享的虚拟机之间可以相互访问
用户定义network:在同一network中的主机是可以相互访问的,host也是相互知道的
用户定义overlay network:主要用于跨宿主机的docker虚拟机之间的通讯

困了,先写个题纲。。。

从Scratch开始建立Docker镜像(二)

首先,还是说明一下,正确的做法是使用工具直接生成你需要的镜像,尽量不要自己折腾。
但我是手工处理的,为了就是折腾。

第二部分的目标,就是在neodeb01的基础上,实现Linux的常用网络功能。

1、新建文件夹neodeb02,把你想放到Docker中的文件放到这个目录下面,比如,我这边结构如下:

├── bin
│   ├── dnsdomainname
│   ├── domainname
│   ├── ip
│   ├── netstat
│   ├── ping
│   └── ping6
├── build.sh
├── Dockerfile
├── etc
│   ├── hosts
│   ├── network
│   │   └── interfaces
│   ├── resolvconf
│   │   └── update-libc.d
│   │       └── avahi-daemon
│   └── resolv.conf
├── lib
│   ├── libip4tc.so.0
│   ├── libip4tc.so.0.1.0
│   ├── libip6tc.so.0
│   ├── libip6tc.so.0.1.0
│   ├── libxtables.so.10
│   ├── libxtables.so.10.0.0
│   └── x86_64-linux-gnu
│       ├── libcom_err.so.2
│       ├── libcom_err.so.2.1
│       ├── libdns-export.so.100
│       ├── libgcc_s.so.1
│       ├── libgnutls-deb0.so.28
│       ├── libgnutls-deb0.so.28.41.0
│       ├── libirs-export.so.91
│       ├── libirs-export.so.91.0.0
│       ├── libisccfg-export.so.90
│       ├── libisccfg-export.so.90.1.0
│       ├── libisc-export.so.95
│       ├── libisc-export.so.95.5.0
│       ├── libkeyutils.so.1
│       ├── libkeyutils.so.1.5
│       ├── liblzma.so.5
│       ├── liblzma.so.5.0.0
│       ├── libnss_dns-2.19.so
│       ├── libnss_dns.so.2
│       ├── libresolv-2.19.so
│       └── libresolv.so.2
├── sbin
│   ├── dhclient
│   ├── ifconfig
│   ├── ifdown
│   ├── ifup
│   ├── ip
│   ├── iptables
│   └── route
└── usr
    ├── bin
    │   ├── base64
    │   ├── host
    │   ├── nslookup
    │   ├── traceroute
    │   ├── traceroute6
    │   ├── wget
    │   └── whois
    ├── lib
    │   ├── libdns.so.100
    │   ├── libdns.so.100.2.2
    │   ├── libisccc.so.90
    │   ├── libisccc.so.90.0.6
    │   ├── libisccfg.so.90
    │   ├── libisccfg.so.90.1.0
    │   ├── libisc.so.95
    │   ├── libisc.so.95.5.0
    │   ├── liblwres.so.90
    │   ├── liblwres.so.90.0.7
    │   └── x86_64-linux-gnu
    │       ├── libbind9.so.90
    │       ├── libbind9.so.90.0.9
    │       ├── libcrypto.a
    │       ├── libcrypto.so
    │       ├── libcrypto.so.1.0.0
    │       ├── libffi.so.6
    │       ├── libffi.so.6.0.2
    │       ├── libGeoIP.so.1
    │       ├── libGeoIP.so.1.6.2
    │       ├── libgnutls-openssl.so.27
    │       ├── libgnutls-openssl.so.27.0.2
    │       ├── libgssapi_krb5.so.2
    │       ├── libgssapi_krb5.so.2.2
    │       ├── libhogweed.so.2
    │       ├── libhogweed.so.2.5
    │       ├── libicudata.so.52
    │       ├── libicudata.so.52.1
    │       ├── libicuuc.so.52
    │       ├── libicuuc.so.52.1
    │       ├── libidn.so.11
    │       ├── libidn.so.11.6.12
    │       ├── libk5crypto.so.3
    │       ├── libk5crypto.so.3.1
    │       ├── libkrb5.so.26
    │       ├── libkrb5.so.26.0.0
    │       ├── libkrb5.so.3
    │       ├── libkrb5.so.3.3
    │       ├── libkrb5support.so.0
    │       ├── libkrb5support.so.0.1
    │       ├── libnettle.so.4
    │       ├── libnettle.so.4.7
    │       ├── libp11-kit.so.0
    │       ├── libp11-kit.so.0.0.0
    │       ├── libpsl.so.0
    │       ├── libpsl.so.0.2.2
    │       ├── libstdc++.so.6
    │       ├── libstdc++.so.6.0.20
    │       ├── libtasn1.so.6
    │       ├── libtasn1.so.6.3.2
    │       ├── libxml2.so.2
    │       ├── libxml2.so.2.9.1
    │       └── openssl-1.0.0
    │           └── engines
    │               ├── lib4758cca.so
    │               ├── libaep.so
    │               ├── libatalla.so
    │               ├── libcapi.so
    │               ├── libchil.so
    │               ├── libcswift.so
    │               ├── libgmp.so
    │               ├── libgost.so
    │               ├── libnuron.so
    │               ├── libpadlock.so
    │               ├── libsureware.so
    │               └── libubsec.so
    └── sbin
        ├── arp
        └── arpd

2、Dockerfile文件

From	neodeb01
ENV	PATH /bin:/sbin:/usr/bin:/usr/sbin
COPY	.	/
CMD	/bin/bash

3、build.sh文件

#/bin/sh
sudo docker build -t neodeb02 .

4、.dockerignore文件

Dockerfile
build.sh
*.swp

5、新建镜像并运行

sudo docker build -t neodeb02 .
sudo docker run -it neodeb02

PS:
如果你遇到了nslookup等,无法初始化安全插件的问题,一般是缺少这个文件夹:
/usr/lib/x86_64-linux-gnu/openssl-1.0.0

PS1:
如果你遇到了可以解析域名,可以ping通ip,但无法ping通域名的时候,除了修改常用的一些网络配置文件。
可以尝试增加libnss_dns。

从Scratch开始建立Docker镜像(一)

最近尝试了从Scratch开始建立Docker镜像,整体来说并不难,就是从现在运行良好的linux机器上,把需要的文件放到Docker镜像里就好了。正确的做法是,使用工具直接生成你需要的镜像,尽量不要自己折腾。但我是手工处理的,为了就是折腾。

第一部分的目标,就是实现Linux的基本功能。

1、新建文件夹neodeb01,把你想放到Docker中的文件放到这个目录下面,比如,我这边结构如下:

├── bin
│   ├── bash
│   ├── cat
│   ├── chmod
│   ├── chown
│   ├── cp
│   ├── date
│   ├── dd
│   ├── df
│   ├── dir
│   ├── echo
│   ├── egrep
│   ├── false
│   ├── grep
│   ├── hostname
│   ├── kill
│   ├── less
│   ├── ln
│   ├── login
│   ├── ls
│   ├── mkdir
│   ├── more
│   ├── mount
│   ├── mv
│   ├── ps
│   ├── pwd
│   ├── rm
│   ├── rmdir
│   ├── sed
│   ├── sh
│   ├── sleep
│   ├── su
│   ├── systemd
│   ├── touch
│   ├── true
│   ├── umount
│   ├── uname
│   └── which
├── boot
├── build.sh
├── dev
├── Dockerfile
├── etc
│   ├── bash.bashrc
│   ├── default
│   │   ├── cron
│   │   ├── locale
│   │   ├── networking
│   │   └── useradd
│   ├── group
│   ├── group-
│   ├── gshadow
│   ├── gshadow-
│   ├── hostname
│   ├── init
│   │   └── networking.conf
│   ├── init.d
│   │   ├── hostname.sh
│   │   └── networking
│   ├── login.defs
│   ├── nsswitch.conf
│   ├── pam.conf
│   ├── pam.d
│   │   ├── atd
│   │   ├── chfn
│   │   ├── chpasswd
│   │   ├── chsh
│   │   ├── common-account
│   │   ├── common-auth
│   │   ├── common-password
│   │   ├── common-session
│   │   ├── common-session-noninteractive
│   │   ├── cron
│   │   ├── gdm-autologin
│   │   ├── gdm-launch-environment
│   │   ├── gdm-password
│   │   ├── login
│   │   ├── newusers
│   │   ├── other
│   │   ├── passwd
│   │   ├── polkit-1
│   │   ├── ppp
│   │   ├── runuser
│   │   ├── runuser-l
│   │   ├── sshd
│   │   ├── su
│   │   ├── sudo
│   │   └── systemd-user
│   ├── passwd
│   ├── passwd-
│   ├── profile
│   ├── security
│   │   ├── access.conf
│   │   ├── group.conf
│   │   ├── limits.conf
│   │   ├── limits.d
│   │   ├── namespace.conf
│   │   ├── namespace.d
│   │   ├── namespace.init
│   │   ├── opasswd
│   │   ├── pam_env.conf
│   │   ├── pwquality.conf
│   │   ├── sepermit.conf
│   │   └── time.conf
│   ├── services
│   ├── shadow
│   ├── shadow-
│   ├── skel
│   ├── subgid
│   └── subuid
├── home
├── lib
│   ├── terminfo
│   │   └── l
│   │       └── linux
│   └── x86_64-linux-gnu
│       ├── libacl.so.1
│       ├── libattr.so.1
│       ├── libaudit.so.1
│       ├── libaudit.so.1.0.0
│       ├── libblkid.so.1
│       ├── libbz2.so.1
│       ├── libbz2.so.1.0
│       ├── libbz2.so.1.0.4
│       ├── libcap.so.2
│       ├── libcrypt-2.19.so
│       ├── libcryptsetup.so.4
│       ├── libcryptsetup.so.4.6.0
│       ├── libcrypt.so.1
│       ├── libc.so.6
│       ├── libdl-2.19.so
│       ├── libdl.so.2
│       ├── libkmod.so.2
│       ├── libkmod.so.2.2.8
│       ├── libmount.so.1
│       ├── libm.so.6
│       ├── libncurses.so.5
│       ├── libncurses.so.5.9
│       ├── libnsl-2.19.so
│       ├── libnsl.so.1
│       ├── libnss_compat-2.19.so
│       ├── libnss_compat.so.2
│       ├── libpamc.so.0
│       ├── libpamc.so.0.82.1
│       ├── libpam_misc.so.0
│       ├── libpam_misc.so.0.82.0
│       ├── libpam.so.0
│       ├── libpam.so.0.83.1
│       ├── libpcre.so.3
│       ├── libprocps.so.3
│       ├── libpthread.so.0
│       ├── libreadline.so.6
│       ├── libreadline.so.6.3
│       ├── librt.so.1
│       ├── libselinux.so.1
│       ├── libsepol.so.1
│       ├── libtinfo.so.5
│       ├── libuuid.so.1
│       ├── libz.so.1
│       └── libz.so.1.2.8
├── lib64
│   └── ld-linux-x86-64.so.2
├── lost+found
├── media
├── mnt
├── opt
├── proc
├── root
├── run
├── sbin
├── srv
├── sys
├── tmp
├── usr
│   ├── bin
│   │   ├── awk
│   │   ├── basename
│   │   ├── clear
│   │   ├── diff
│   │   ├── diff3
│   │   ├── du
│   │   ├── env
│   │   ├── find
│   │   ├── gawk
│   │   ├── id
│   │   ├── passwd
│   │   ├── size
│   │   ├── sort
│   │   ├── time
│   │   ├── vi
│   │   ├── which
│   │   ├── who
│   │   └── whoami
│   ├── lib
│   │   ├── libbfd-2.25-system.so
│   │   └── x86_64-linux-gnu
│   │       ├── libgmp.so.10
│   │       ├── libgmp.so.10.2.0
│   │       ├── libmpfr.so.4
│   │       ├── libmpfr.so.4.1.2
│   │       ├── libsemanage.so.1
│   │       ├── libsigsegv.so.2
│   │       ├── libsigsegv.so.2.0.3
│   │       └── libustr-1.0.so.1
│   └── sbin
│       ├── chgpasswd
│       ├── chpasswd
│       ├── chroot
│       ├── groupadd
│       ├── groupdel
│       ├── groupmod
│       ├── service
│       ├── useradd
│       ├── userdel
│       └── usermod
└── var

2、Dockerfile文件

From	scratch 
ENV	PATH /bin:/sbin:/usr/bin:/usr/sbin:$PATH
COPY	.	/
RUN	/bin/ln -s lib64/ld-linux-x86-64.so.2	lib/x86_64-linux-gnu/
CMD	/bin/bash

3、build.sh文件

#/bin/sh
sudo docker build -t neodeb01 .

4、.dockerignore文件

Dockerfile
build.sh
*.swp

5、新建镜像并运行

sudo docker build -t neodeb01 .
sudo docker run -it neodeb01

PS:
一定要先把ld-linux-x86-64.so.2放到镜像中,否则无论你执行什么命令,镜像系统都告诉你

System error: no such file or directory

我在这个上面浪费了不少时间,学艺不精啊

PS1:
如果遇到I have no name的错误,一般是因为etc下的几个配置文件错误导致的,shadow gshadow group passwd。
但精简掉libnss_compat后,也会报同样的错误。

PS2:
如果遇到unknown terminal type的问题,要修改两个地方。一个是在.bashrc中

export TERM=linux

另一个是,要把文件夹/lib/terminfo中需要的内容,一起拷贝过去。

Docker原理03

最后,咱们聊一下,Docker是如何实现虚拟化的。

1、先说一下Docker镜像
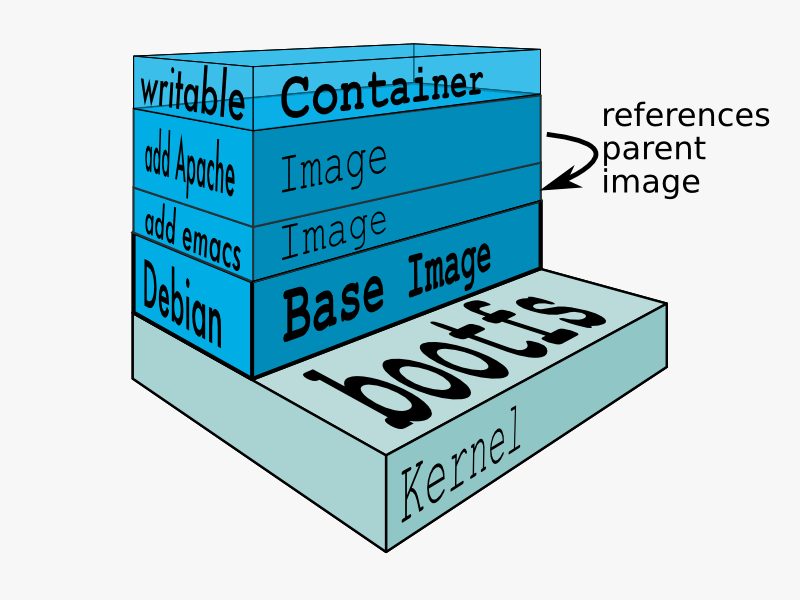
Docker多层文件系统
从图上可以看出,每一个镜像由一系列的层(layers)组成(Debian,Add Emacs,Add Apache,writable,但不包括内核,内核是与宿主机公用的)。

可如下复现:下载Debian镜像(200m),添加Emacs(20m)后,生成一个新的镜像,然后添加Apache(80m)后,生成了下一个新的镜像,然后运行时,挂在了一个可读写曾,供应用软件写数据。
如果不用分层式架构,那Debian镜像为200m,Emacs镜像为220m,Apache镜像为300m,你的硬盘一共需要720m。而分层后,各层只需要存储与原来不同的文件,所以结果为Debian镜像为200m,Emacs镜像为20m,Apache镜像为80m,你的硬盘一共需要300m。
分层的另外一个好处是,如果你希望新建一个Jetty(60m)镜像,同样可以从Debian镜像进行,这样相互之间就可以很好的复用已有镜像了。同样的,镜像升级的时候,也只需要更新自己所在的层,重新打包一个镜像,就可以升级完毕了。

那分层镜像架构,在运行时,是如何挂载到一起的呢?
答案是联合文件系统(UnionFS)。Union文件系统允许独立文件系统中的文件和文件夹(称之为分支)被透明覆盖,形成一个单独连贯的文件系统,所以可以方便的将这些层联合到一个镜像中。

2、再说一下容器是实现隔离的呢?
容器主要作用是隔离工作空间,虚拟机之间相互隔离,虚拟机与宿主机之间也相互隔离。当容器运行的时候,Docker就需要为该容器创建一个命名空间集合,每一个应用在它们自己的命名空间中运行而且不会访问到命名空间之外。
现在常用的容器有:Linux的LXC,BSD的Jails,Solaris的Zone等。

Docker使用到的命名空间有:
pid命名空间: 使用在进程隔离(PID: Process ID)。
net命名空间: 使用在管理网络接口(NET: Networking)。
ipc命名空间: 使用在管理进程间通信资源 (IPC: InterProcess Communication)。
mnt命名空间: 使用在管理挂载点 (MNT: Mount)。
uts命名空间: 使用在隔离内核和版本标识 (UTS: Unix Timesharing System)。

3、容器是如何管理硬件资源的呢?
答案是群组控制。
群组控制允许Docker分享或者限制容器使用硬件资源。
Docker使用了cgroups技术来管理群组。

Docker原理02

然后,咱们聊一下,Docker是如何运行的。

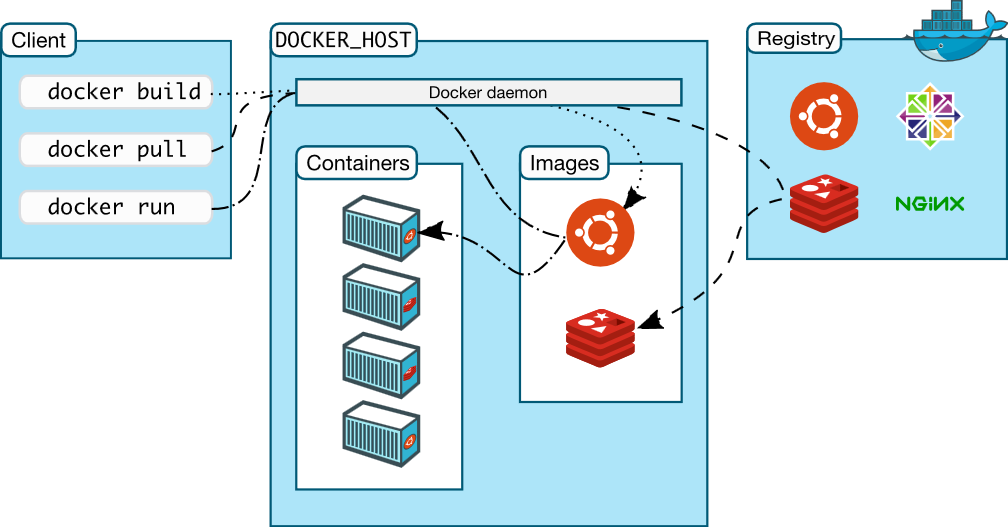
Docker整体架构如下(假设你比较熟悉VMWare或VirtualBox):
Docker Architecture
Docker Client:与Docker Deamon交互,告诉Docker Deamon要做什么,可以理解为一个远程执行Docker相关各种指令的工具
Docker Host:Docker Deamon的运行环境,就是宿主机
Docker Deamon:Docker服务,管理容器的创建,运行,停止等,是核心服务
Docker Images:Docker镜像,可以先理解为存放GuestOS所需二进制文件的只读光盘(这个不准确的,其实有分层结构),比如你可以把Ubuntu的可运行环境,经过定制后,做成一个镜像(不需要内核,不需要自己重头开始建立)
Docker Containers:Docker容器,通过某个镜像来创建,可以理解为一个虚拟机的实例
Docker Registry:Docker仓库,用来存放大家做好的镜像文件,可以方便的查询和下载

那当你运行下面指令时,究竟发生了什么呢?

# 利用基础镜像为ubuntu创建一个容器,采用交互模式运行(-it),并在容器中执行命令/bin/bash,
docker run -it ubuntu /bin/bash

1、查找并获取镜像文件:Docker检查本地是否有ubuntu镜像,如果本地没有该镜像,Docker会从Docker Hub下载。
2、创建容器:如果镜像已经存在或镜像下载后,Docker会使用它来创建新的容器。
3、分配文件系统并且挂载一个可读写的层。
4、分配网络/桥接接口: 创建一个允许容器与本地主机通信的网络接口。
5、设置一个IP地址: 从池中寻找一个可用的IP地址并且服加到容器上。
6、运行你指定的程序:按上面的命令,应该为/bin/bash
7、捕获并且提供应用输出: 连接并且记录标准输出、输入和错误让你可以看到你的程序是如何运行的。

那大家看下来,步骤1、6、7没有什么难理解的,但2、3、4、5究竟在做什么呢?

Docker原理01

首先聊一下虚拟化技术。

虚拟化离我们很近,平时我们接触的虚拟化技术种类很多,比如硬件虚拟化(超线程技术),虚拟设备(虚拟光驱、虚拟软件、WinMount)、虚拟网络(VPN),桌面虚拟化(虚拟桌面、远程桌面),虚拟内存(利用交换文件或交换分区扩展系统可用内存),存储虚拟化(硬盘分区,网络硬盘映射),各类游戏机模拟器等。有些技术用的是如此普遍,你并不一定觉得它应该归类到虚拟化技术之中。但是,一旦提到虚拟化技术,你一定会想到其中一个,那就是虚拟机。

虚拟机技术按实现方式,分为纯硬件虚拟化、纯软件虚拟化及基于硬件辅助的软件虚拟化。其中纯硬件虚拟化,一般在大型机上实现的比较多,操作系统比较单一(其实支持该硬件架构的操作系统就可以,但多数情况下同一型号大型机操作系统的确比较单一),硬件架构复杂。纯软件虚拟化,其实现技术比较复杂,一般通过hypervisor提供硬件虚拟层,支持多种操作系统。时至今日,很多设备都提供了硬件辅助虚拟化的功能,这大大降低了虚拟机管理软件的实现难度,并增强了虚拟机的执行效率,所以现在一般的虚拟化软件都支持基于硬件辅助的软件虚拟化。

虚拟机技术按虚拟化程度分为三种,第一种是完全虚拟化,第二种准虚拟化,第三种是操作系统级层虚拟化。其中,
完全虚拟化,直接用软件/硬件辅助方式,不修改Guest,模拟虚拟机的全部硬件的技术,一般支持多种操作系统,但效率一般不高;
准虚拟化,直接用软件/硬件辅助方式,并同时通过修改Guest,对其进行一定程度的“欺骗”,实现与hypervisor相配合,实现虚拟化的技术,一般支持多种操作系统,运行效率比较高;
操作系统层虚拟化,是利用操作系统特性,利用一个操作系统内核,模拟多台虚拟设备的方式,由于一般需要共享操作系统内核,一般只支持一类操作系统;

还有一类特殊的虚拟机软件,叫跨平台虚拟化,允许针对特定CPU或者操作系统的软件,不做修改就能运行在其他平台上。如Wine(在Linux上模拟Windows应用),还有我们用的各类游戏模拟器(在Windows/Linux上模拟红白机FC、Projetc64、PSP)等。

那我们回过头来看下Docker的虚拟化方式与普通虚拟化方式的区别:
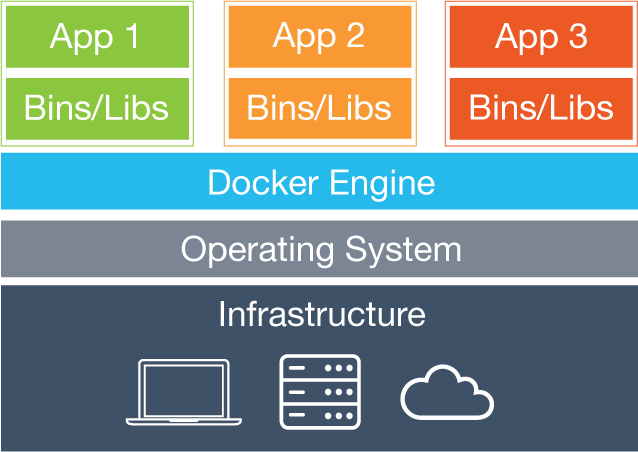
A、Dcoker虚拟化
Dcoker虚拟化
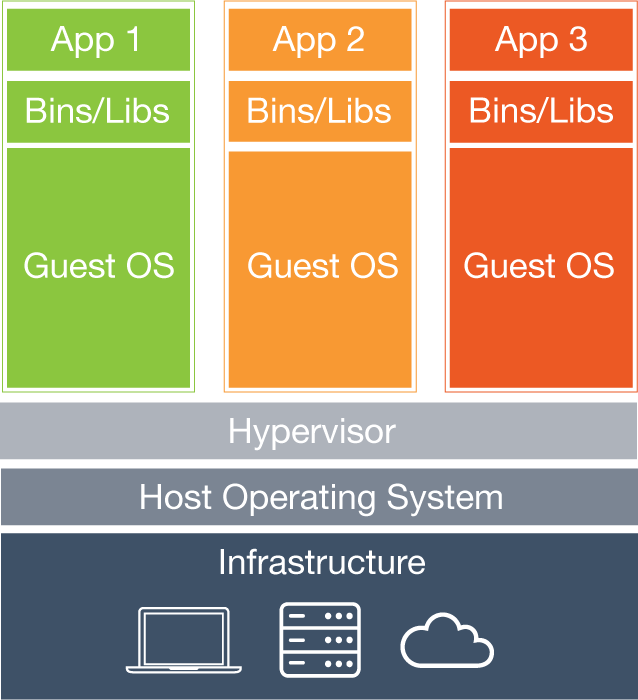
B、VMware VirtualBox虚拟化
VMware VirtualBox虚拟化

比较下来就很清楚了:

项目 Docker VMware VirtualBox
虚拟化技术 纯软件虚拟化 纯软件虚拟化+基于硬件辅助的软件虚拟化
虚拟化程度 操作系统级层虚拟化 完全虚拟化+准虚拟化
硬件抽象层 不需要 hypervisor
运行效率 安装插件前,效率较低;安装插件后,效率较高
支持系统 Linxu各发行版 硬件架构支持即可安装
需要安装Guest系统 共享内核,应用软件需要安装 完全安装

Docker建立自己的image

1、首先到dockerhub注册自己的账号
dockerhub

2、新建一个repository名字为justatest

3、取回debian6的镜像

docker pull debian:6

4、新建~/Docker/justatest/Dockerfile

From debian:6
RUN apt-get -y update && apt-get install -y fortunes
CMD /usr/games/fortune -a

5、创建并上传你的image

#创建image
docker build -t justatest .
#运行image
docker run justatest
#查看你的image id
docker images
#进行标记
docker tag image-id neohope/justatest:latest
#登录
docker login
#上传
docker push neohope/justatest
#下载
docker pull neohope/justatest
#运行
docker run neohope/justatest

安装Docker

按官方说法,Docker客户端现在可以安装到Linxu、Windows和MacOS上。但其实,在Windows和MacOS上,都需要安装一个工具叫做Docker Toolbox。该工具的作用是,帮你安装VirtualBox,创建虚拟机,并用Boot2Docker进行启动。

说实话,该工具做的还不是很完善,而且做了太多的假设,我并不喜欢。比如虚拟机路径必须在~/.docker/machine下面。比如会强制帮你安装网卡。比如docker-machine获取虚拟机的IP时,默认虚拟机第二块网卡设置为Host-Only,并通过VBoxManage获取虚拟机第二块网卡IP地址(源码中写死的)。不推荐大家使用。如果一定要用的话,大家还是不要用docker-machine,只需要docker和Git就够了。

说这么多,就是不想大家花费太多时间,用不完善的工具,来体验Docker的强大 。所以建议大家还是直接使用Linux,或者在虚拟机里自己安装Linux会好一些。我喜欢Debian,但如果你不太熟,建议用Ubuntu。

1、安装Linux,并保证可以联网

2、安装Docker

#从网址取回文件,输出到标准输出,并传递给sh执行
wget -qO- https://get.docker.com/ | sh

3、测试安装是否成功

#docker从repository取回hello-world:latest的镜像,并运行
docker run hello-world

#docker从repository取回debian:latest的镜像,并运行bash命令
docker run -it debian bash

4、docker常用命令

#查看本地有哪些镜像
docker images

#查找debian镜像
docker search debian

#取回debian6的镜像
docker pull debian:6

#按image-id删除镜像
docker rmi image-id

#查看当前运行的容器
docker ps

#kill一个容器
docker kill contianer-id

#删掉一个容器 
docker rm contianer-id

#杀掉所有容器
docker kill $(docker ps -a -q)

#删除所有容器
docker rm $(docker ps -a -q)

PS:
boot2docker的默认用户为docker,密码为tcuser